Interested in other articles?
Interested in other articles?
A guide to 3D printing processes
When first considering 3D printing, it’s important to understand that there is not just one method. In fact, there are quite a few. And it’s important that you select the right one to meet the specifications of your manufacturing project. Choosing the appropriate 3D printing or additive manufacturing process requires an understanding of the strengths and weaknesses of each method and applying those attributes to the specific needs of your product’s development.
But it is not just about choosing the 3D printing process that best aligns to the finished object. As with any manufacturing project, the outcome must also be evaluated against other criteria, including the available budget, the desired mechanical, strength and motion requirements, the type of finish and scale of production.
The additive manufacturing process you choose is also influenced by what stage of design and production you are in. For example, when development is the primary goal in the early stages of design, you will want to focus on printing quickly and cheaply and worry less about surface finish or scale costs. But once your design is honed, then factors like cosmetics and finish will begin to matter. That said – there are also significant cost- and time-savings to 3D printing a prototype that functions like a final product – industrial 3D printing technologies like HP Multi Jet Fusion allow you to do just that, allowing you to move very quickly from the design to production stage.
Only you know where you are at in your design stage and what the specific requirements of your business are, but to help you come to a decision about the type of process that will most suit you, we will take you through some of the most common types of 3D printing technologies and discuss the benefits of each, as well as the materials that it is most suited to.
In short, the most common types of 3D printing processes are:
- Sheet Lamination
- Direct Energy Deposition
- Material Extrusion
- Material Jetting
- Binder Jetting
- Vat Photopolymerization
- Powder Bed Fusion
Let’s go into more detail about each method.
Sheet Lamination
Sheet Lamination is made by binding large sheets together with external force. The sheets could be metal, paper or a form of polymer. For hard materials, the sheets will be fused together by ultrasonic welding in layers and then milled into the required shape. If the material is paper, then sheets can be glued by adhesive and then cut into a precise shape.
Sheet lamination processes might include Ultrasonic Additive Manufacturing (UAM) or Laminated Object Manufacturing (LOM). The UAM process uses sheets or ribbons of metal including aluminum, copper, stainless steel or titanium, that are bound together by ultrasonic welding. The process then requires additional CNC machining, including the removal of the unbound metal. UAM is generally low temperature, which means the process can bond different materials and, since the metal is not melted, requires relatively little energy.
LOM uses a similar layer-by-layer approach but uses paper as material and adhesive instead of welding. The LOM process uses a cross hatching method that allows for easy removal after printing is completed. Laminated objects are mostly used for aesthetic or visual models and are not generally suitable for structural use.
Materials: Paper, plastic, metal, sheet material that can be rolled
Step-by-step process for Sheet Lamination:
- The material is placed exactly on the cutting bed
- It is then bonded over the previous layer
- The required shape is then cut, using laser or blade
- The next layer is added
- Steps two and three can be reversed, and the material can be cut before being positioned and bonded
Pros:
- Cutting can be done at speed
- Cost effective
- Easy material handling
Cons:
- Finishes vary depending on paper or plastic material
- Post-processing usually required to achieve desired effect
- Limited materials available
- Strength and integrity of models can depend on adhesive used
Directed Energy Deposition (DED)
Directed Energy Deposition (DED) - also known as Directed Metal Deposition (DMD) - is widely used in the metal industry and for rapid manufacturing. It consists of 3D printing equipment that is typically attached to a multi-axis robotic arm with a nozzle that deposits metal powder or wire onto a surface. The metal is melted by an energy source that could be a laser, electron beam or plasma arc, which forms the new solid part. With DED the nozzle is not fixed to a specific axis and can move in multiple directions. This means that the material can be deposited from any angle and is melted upon deposition.
Materials: Metals including cobalt, chrome, or titanium.
Step-by-step process for Direct Energy Deposition (DED):
- A multi-axis arm with print nozzle moves around a fixed object
- Material is deposited from the nozzle onto an existing surface
- The deposited material is then melted using a laser, electron beam, or plasma arc
- Further material is added layer-by-layer and solidifies
Pros:
- High level control of the grain structure
- Ability to enact quality repair work on functional parts
Cons:
- High accuracy is often sacrificed for speed
- Finishes may require post-processing to achieve desired effect
- Limited material use
Material Extrusion
The most common form of Material Extrusion is Fused Deposition Modeling (FDM), which uses a plastic filament unwound from a spool and supplied to a nozzle. The nozzle then melts the material and moves via a remote-controlled mechanism. The extruded melted material forms layers as it cools and hardens, and the material layers can be bonded with temperature or chemical agents. At the same time, another nozzle extrudes a dissolvable secondary material that is used to support the part as it cools.
FDM is similar to other 3D printing processes that build layer-by-layer, but it also varies because the material is added through a nozzle under constant pressure and in an unbroken stream. This pressure must be kept steady and the speed constant to enable optimum results.
FDM is proprietary technology that is trademarked. The exactly equivalent term, Fused Filament Fabrication (FFF) is not owned or trademarked, and thus can be utilized more freely.
Materials: Plastics and polymers, including ABS, Nylon, PC, and AB.
Step-by-step process for Material Extrusion:
- The first layer is built as the print nozzle deposits material onto the cross-sectional area of the first slice
- The next layers are added on top
- Layers are fused together upon deposition while the material is in a melted state
- When it cools and hardens, the final object is formed
Pros:
- Widespread and accessible process
- Inexpensive and suitable for domestic or hobbyist 3D printers
- Uses easily obtainable materials
Cons:
- The nozzle radius limits can impact the final quality
- Accuracy and speed of production are low compared to other processes
- Constant pressure of material is required to improve the finish
- May require additional material for the support structure
Material Jetting
In Material Jetting, the chosen material is applied in droplets through a small diameter nozzle, similar way to a 2D inkjet paper printer. Material is jetted onto a build platform using either a continuous or Drop on Demand (DOD) approach. It is applied layer-by-layer to a build platform and then hardened by UV light. Material Jetting also requires support for the part, which is printed simultaneously during building from a dissolvable material that is removed afterwards.
Apart from Material Jetting itself, there are two other technologies included in this category: Nano Particle Jetting (NPJ), which is trademarked, and Drop-on-Demand (DOD).
Because the material is deposited in drops, this limits the materials available - typically polymers and waxes are used, but also metals can be used.
Materials: Plastics, polymers, and metals.
Step-by-step process for Material Jetting:
- The print head is positioned above the build platform
- Droplets of material are deposited where required by the print head onto the surface, using either thermal or opiezoelectric method
- The first layer is formed as the droplets of material solidify
- Subsequent layers are applied on top of the previous layer
- Layers are allowed to cool and harden or are cured by UV light
- Post-processing can include removal of support material
Pros:
- High accuracy of deposition of droplets
- Low waste
- Multiple material parts and colors can be made in a single process
Cons:
- Support material is often required
- Limited materials
Binder Jetting
Binder Jetting uses a powder-based material and a liquid binder, which acts as an adhesive between layers. With Binder Jetting, a print head moves horizontally along the X and Y axes of the 3D printer, and deposits the powder material and the binding material in alternate layers. After each layer, the build platform lowers the object being printed by the same thickness as the layer. As with many of the other powder-based printing methods, support structures are not needed as the 3D printed object is supported in the powder bed and then just needs to be removed or unpacked from the unused powder once the 3D printing process ends.
This method of 3D printing is fast, but does require significant post-processing, for which typically sand or metal are used. And the nature of the binder material, required for this method, means that objects made in this way are not always suitable for heavy duty, structural use.
Materials: Polymers, Metals, Ceramics, Glass.
Step-by-step process for Binder Jetting:
- A roller spreads powder material over the build platform
- The printhead deposits an adhesive on top of the powder as required
- The build platform is lowered by the model’s layer thickness
- Additional layers of powder are spread over the previous layers
- The object forms as the powder is bound to the liquid
- Any unbound powder surrounding the printed object is removed
- The process is then repeated until the final object is made
Pros:
- Generally a fast process
- Parts can be made with a range of different colors
- Wide range of materials
- Two-material method allows different binder-powder combinations
Cons:
- Not always suitable for structural parts
- Additional post-processing can lengthen overall process
HP Metal Jet
HP Metal Jet technology is a relatively new binder jetting metal 3D printing process. It also does not require support structures and uses HP Thermal Inkjet nozzles to precisely deliver HP Metal Jet binding agent to a powder metal bed, using industry-standard metal injection molding (MIM) metal powders (stainless steel). This technology can produce multiple metal parts at the same time, with isotropic properties and density similar to MIM.
Vat Photopolymerization
Vat Photopolymerization involves exposing a light-activated polymer resin to a specific wavelength, so that it undergoes a chemical reaction and becomes a solid.
Vat Photopolymerization uses a vat, of liquid photopolymer resin. Within this vat the object is constructed layer by layer, and a UV light is used to cure or harden the resin. After each new layer is cured, a platform moves the object being made downwards, and the process begins again.
Unlike with powder-based printing methods, where support is given from the unbound material, Vat Photopolymerization uses liquid to form objects and so there is no structural support during the build phase. This often means that support structures will need to be added separately and later removed.
The resins are cured using a process of photopolymerization, in which a UV light is directed across the surface of the resin with the use of mirrors. When the resin comes into contact with the light, it will harden, leaving the finished object.
Materials: Plastics, Polymers, Resins.
Step-by-step process for Vat Photopolymerization (general):
- The build platform is lowered from the resin vat by the thickness of the layer
- An ultraviolet light cures each individual layer of resin
- The platform continues to move downwards as additional layers are built on top of the existing layers
- Machines may use a blade that moves between layers to provide a smooth resin base for the next layer
- The vat is then drained of resin and the object is complete
Pros:
- High level of accuracy
- Good finish
- Relatively fast process
- Large build areas and final object weights
Cons:
- Can be relatively expensive
- Post-processing time can be significant
- Limited material use of photo-resins
- Requires support structures
- Post curing can be required for parts to be strong enough for structural use
Three different heat sources are available when using this technique:
Click image to enlarge
- Stereolithography (SLA) uses a laser to selectively melt and cure the liquid plastic, tracing the cross-section progressively and building up the part layer by layer.
Click image to enlarge
- Direct Light Processing (DLP) uses a DLP projector to flash all voxels of the layer at the same time.
Powder Bed Fusion (PBF)
The Powder Bed Fusion (PBF) category includes commonly used 3D printing processes including Direct Metal Laser Sintering (DMLS), Electron Beam Melting (EBM), Selective Heat Sintering (SHS), Selective Laser Melting (SLM) and Selective Laser Sintering (SLS) and Multi Jet Fusion (MJF).
The various types of Powder Bed Fusion typically use heat or light energy, usually in the form of a laser or electron beam energy, to fuse or melt material powder together – and involve spreading powder over previous layers. There are different mechanisms to achieve this, including a roller or blade, while a hopper or a reservoir positioned below the bed will add a fresh material supply.
There are, however, differences between types of PBF.
For example, SLS uses a laser to sinter powder into a single three-dimensional shape. After each section is fused, the powder bed is lowered by one layer thickness and a new layer is applied on top and the process is repeated until the object is completed.
DMLS is the same as SLS but is for use with metals and not plastics. The process uses a laser beam to sinter (technically, partially melt) metal powder and form the material by melting it into a solid part. Layers are then added with a roller before a platform lowers the model to the next layer. It is important to note, that the solid mass is formed by heating and applying pressure to the metal material, but not melting it fully to the point of liquefaction. DMLS requires support structures that are usually created using the same material as the main part being 3D printed – this needs to be factored into the total cost of material required to produce the part.
SLM, on the other hand, uses a laser beam to fully melt the material and also requires a support structure.
Materials: Powder-based polymers (including nylon) and metals (including stainless steel, titanium, aluminum, cobalt chrome, and copper).
Pros:
- Cost effective
- Wide range of material options
Cons:
- Some size limitations apply
- Finish can be dependent on powder grain size
Unlike other methods, EBM requires a vacuum build environment in order to fuse metals and alloys to create a variety of functional parts. As the name suggests, it uses a high-energy electron beam, and can only be used with conductive materials.
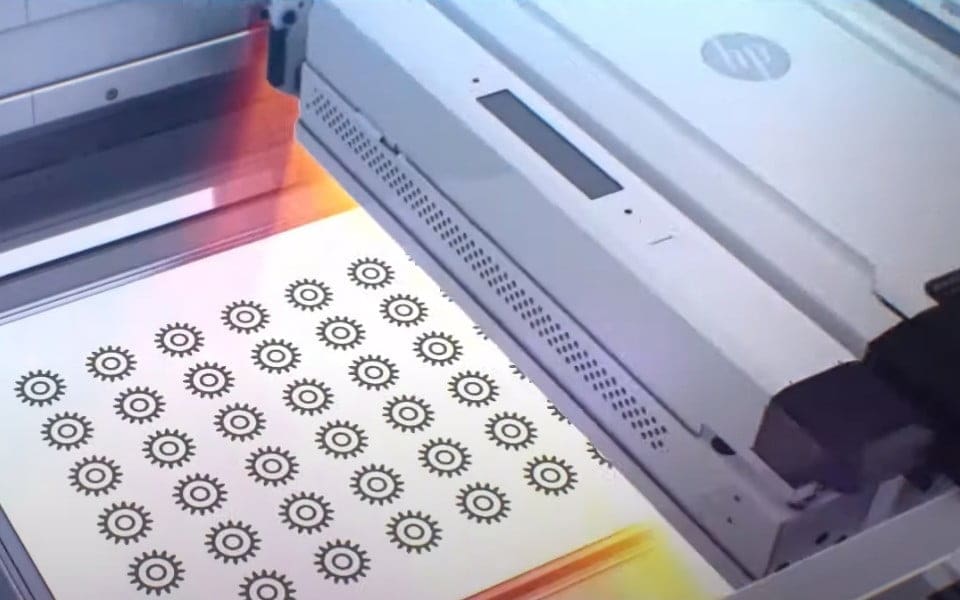
HP Multi Jet Fusion (MJF)
HP Multi Jet Fusion (MJF) is a combination of Powder Bed Fusion and binder jetting technologies. Unlike SLS or FDM, which use a point-by-point printing approach, HP MJF technology can print a complete layer at the same time, using proprietary HP PageWide printing technology. With HP MJF, a layer of powder material is spread on the print bed. Then, the fusing and detailing agents are deposited at voxel-level on top of the powder, defining the regions of the layer that need to be fused or protected from fusion respectively. Heat is applied to the bed, and the areas where the fusing agent was deposited are fused. Once these fused layers cool down, they solidify and build the designed 3D printed part.
Want to continue learning?
Next article
Related article
Related content