Thank you for visiting the NEW ZEALAND HP Store
-
Contact Us
CONTACT USCall us
- Sales
- 0800 854 848
- Technical support
- +64 9884 8600
Mon-Fri 9.00am - 6.00pm
(exc. Public Holidays)
Chat with us- Our specialist are here to help
- Live chat
Mon-Fri 9.00am - 6.00pm
(exc. Public Holidays)
Submit feedback We value your opinion! - My Account
Search
HP Printer Setup Guide: Quick and Easy Installation

Posted:
April 10, 2026
Categories:
Printer
Looking to set up your HP printer? You’ve come to the right place. In 2026, setting up your HP printer is simpler than ever, thanks to the HP app (previously known as HP Smart). This guide walks you through the entire setup process for Windows, macOS, iOS, Android, and Chromebook, so you can start printing with ease.
You’ll discover how to connect to Wi-Fi, install drivers, print a test page, and resolve common problems in just a few minutes. We’ll also cover alternative setup methods and provide essential security advice to keep your printer reliable — whether you’re using it in a home office or small workplace across New Zealand.
Contents
Before You Begin: What You Will Need
Before powering on your new HP printer, gather a few essentials for a smooth setup:
- Your printer, unboxed and positioned in its intended location
- A power outlet nearby
- Your Wi-Fi network name (SSID) and password
- A connected device (such as a laptop, smartphone, or tablet) already on the same network
- The free HP app, downloaded to your computer or mobile device
Important Note: The HP app has replaced HP Smart. While older guides may refer to HP Smart, the HP app includes all the same features plus new enhancements. Make sure to install the latest version for optimal performance.
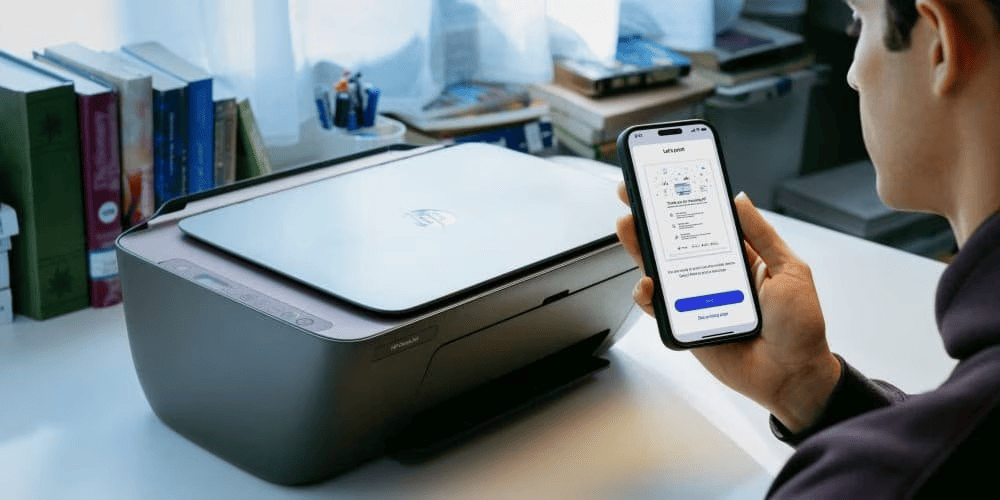
HP App Setup (Recommended Method)
The HP app is the fastest and most reliable way to get your printer working on your network and installed on your devices.
Step 1: Download the HP App
Don’t look for installation discs or separate driver files — the app handles everything.
- Go to the official setup page: Open a web browser on your computer or mobile device and navigate to hp.com
- Select your device: The site will auto-detect your device type (Windows, macOS, Android, or iOS)
- Download and install: Follow the on-screen prompts to download the HP app. Open the downloaded file or launch your app store to install the application
Step 2: Prepare Your Printer
While the app downloads, prepare your hardware:
- Remove all packaging: Open your printer and remove all protective tapes, plastics, and cardboard inserts from paper trays, the scanner bed, and cartridge access area
- Install cartridges: Follow the included instructions to carefully install the starter HP ink or toner cartridges. This step is critical for proper initialisation
- Load paper: Insert a stack of fresh paper into the main input tray
- Power on: Plug the printer into a wall outlet and press the power button. The printer will begin its self-initialisation sequence
Step 3: Connect Using the HP App
This is where the setup becomes automatic:
- Open the HP app: Launch the application on your computer or mobile device
- Add your printer: Look for the plus sign icon (+) or a button labelled “Set up a new printer”
- Follow guided setup: The app will detect your new printer using Bluetooth® or a temporary direct Wi-Fi connection. It will then automatically transfer your Wi-Fi network details from your device to the printer
- Complete registration: The app will prompt you to complete registration and, if applicable, set up optional services like HP Instant Ink
Step 4: Test Your Connection
After the app confirms a successful connection, send a test print job from your computer or phone. This verifies the connection and ensures your device has the proper HP printer driver installed — which the app typically installs in the background.
How to Connect Your HP Printer to Wi-Fi
If the HP app installation fails or you’re switching to a different network, here are two reliable manual methods.
Automatic Wi-Fi Setup (WPS Method)
For the fastest setup, use Wi-Fi Protected Setup (WPS) if both your router and printer support it:
- Press and hold the WPS button on your router until its light begins blinking
- Within two minutes, press and hold the Wi-Fi button on your printer
- The connection is successfully established when the printer’s Wi-Fi light illuminates solid blue
Manual Wi-Fi Setup (Control Panel Method)
For printers with a touch screen:
- Select Setup or Settings from the control panel
- Navigate to Network/Wireless Settings
- Launch the Wireless Setup Wizard
- Select your network name (SSID) from the displayed list
- Enter your Wi-Fi password using the on-screen keypad
Troubleshooting Wi-Fi Connection Issues
- Keep the printer within range of your router
- Ensure it’s connecting to the 2.4 GHz band if your model requires it
- Restart your router, printer, and connected device to clear temporary glitches
- Verify you’ve entered the correct Wi-Fi password
How to Set Up Your HP Printer for Multiple Devices
Once your printer is on Wi-Fi, adding more devices is straightforward — ideal for households or small Kiwi businesses where several people share the same printer.
Add to Additional Computers
Windows/macOS:
- Install the HP app on the new computer
- Select Add Printer and choose your printer from the network
- Alternatively, add it from your OS printer settings and install drivers when prompted
Mobile Device Setup (iOS/Android)
- Install the HP app on each mobile device
- Tap Add Printer and select your printer
- On iOS, you can also use AirPrint directly from apps like Photos or Mail once the printer is on the same network
Network Printer Sharing Options
- VLAN or Guest Networks: Allow mDNS/Bonjour discovery across segments or add the printer by IP address
- Managed Offices: Your IT administrator can publish the printer via print servers or Google Admin Console for Chromebook fleets
- Guest Printing: Provide guests with your Wi-Fi network credentials or a secure guest SSID that permits printing
Security Note: Avoid open networks. Require a strong password and rotate it regularly.
Alternative Setup Methods
USB Cable Setup
- Connect your printer to your computer with a USB cable
- Install via the HP app or follow OS prompts
- Later, convert the USB setup to wireless in the HP app under Printer Settings
Ethernet Connection (Supported Models)
- Plug your printer into your router or network switch with an Ethernet cable
- The HP app or operating system should auto-discover the printer on the network
- Ethernet is ideal for small businesses that prefer wired reliability over wireless
HP Print and Scan Doctor (Windows)
If Windows cannot find your printer or print jobs fail:
- Run HP Print and Scan Doctor from the HP app or HP support page
- It automatically fixes common discovery, queue, and driver issues
Manual Driver Installation
- Visit hp.com and enter your printer model
- Download the full driver package
- Install the drivers, then add the printer from your OS printer settings
Keeping Your Ink and Toner Stocked
Running out of ink mid-project is a common frustration. Keep a supply of genuine HP cartridges on hand and explore the HP ink, toner, and paper range for your specific model. Using genuine HP consumables helps maintain print quality and protects your printer’s warranty.
Common Setup Problems and Solutions
Q: Why can’t the HP app locate my printer?
A: Ensure your phone or computer and printer are connected to the same Wi-Fi network. Restart your router, printer, and device. Temporarily disable your VPN. Check firewall settings and allow the HP app to connect on private networks. On your printer, run the Wireless Setup Wizard again to confirm connection. If network discovery is restricted, add the printer using its IP address.
Q: I’m encountering an account registration issue.
A: Update the HP app to the latest version. Log out and log back in. Try Guest Mode in the app first, then link your HP account afterwards. Clear the HP app cache (mobile) or reinstall the application (desktop).
Q: How do I transition from HP Smart to the HP app?
A: Download the HP app. Upon first launch, it will identify your current printers and transfer your settings. When you log in with the same HP account, your saved printers, network configurations, and shortcut workflows remain accessible.
Q: My printer is connected, but it won’t print.
A: Check paper, ink, and toner levels and remove any blockages. Access your print queue and cancel any stuck print jobs. Verify you’ve selected the correct printer if you have multiple devices. Run HP Print and Scan Doctor (Windows) or reset the printing system (macOS) and re-add your printer. Power cycle the printer: turn it off for 30 seconds, then turn it back on.
Security Best Practices
Keep your wireless printer secure and your documents private with these essential steps.
Network Security:
- Use strong Wi-Fi passwords and avoid default router credentials
- Require a password for wireless access and rotate it regularly
Printer-Level Security:
- Enable printer PIN protection for models that support it
- Limit remote printing to trusted devices and networks only
Maintenance:
- Update firmware regularly through the HP app or by checking monthly
- Enable auto-updates in the HP app for continuous protection
Access Control:
- Provide a separate guest SSID with limited LAN access if you frequently host visitors
- Review cloud and mobile app permissions carefully
- Only grant access to apps you trust (Microsoft 365®, Adobe Acrobat®, note-taking apps, etc.)
Conclusion
You’ve now learned how to unbox your printer, connect it to Wi-Fi, install the appropriate drivers, print a test page, and add multiple devices. You also have simple solutions for common problems and a solid understanding of essential security practices. Whether you’re completing tasks at home, managing a small business, or helping whānau with their setup, the HP app ensures quick and reliable printer installation.
Ready to find the perfect printer for your needs? Browse the full range of HP printers available in New Zealand — from compact home models to high-volume business solutions.
Recent Posts


Popular Posts


Products purchased through this store are sold and fulfilled by Ingram Micro (NZ) LTD
CONTACT US
Call us
- Sales
- 0800 854 848
- Technical support
- +64 9884 8600
Mon-Fri 9.00am - 6.00pm
(exc. Public Holidays)
Chat with us
- Our specialist are here to help
- Live chat
Mon-Fri 9.00am - 6.00pm
(exc. Public Holidays)
Submit feedback
We value your opinion!