Follow the steps listed below to print the two Diagnostics pages.
Note: It may be helpful to print out these instructions before you start to print the Diagnostics page.
| Figure | Step |
|---|---|
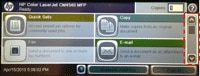
Figure 1: Home screen.
|
1. Go to the home screen on the touchscreen, then locate the scroll bar on right as shown in Figure 1. |
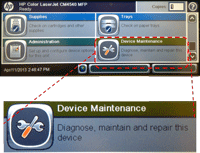
Figure 2: Process Update.
|
2. Touch the down arrow on the scroll bar to find DEVICE MAINTENCE. Then touch DEVICE MAINTENCE. |
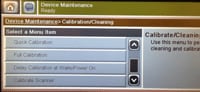
Figure 3: Touch Calibration/Cleaning.
|
3. Find and touch CALIBRATION/CLEANING. |
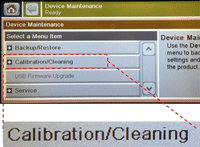
Figure 4: Scroll Bar.
|
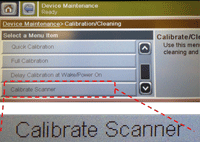
4. Touch the scroll bar on the left as shown in Figure 4, and find CALIBRATE SCANNER. |
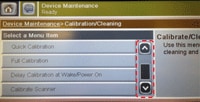
Figure 5: Touch Calibrate Scanner.
|
5. Touch CALIBRATE SCANNER. |
Figure 6: Touch NEXT and follow the instructions on the screen from step 1 to 7.
|
6. Touch NEXT on the touchscreen to start the calibration instruction. Messages on the touchscreen will lead you through the calibration process from step 1 to 7. |
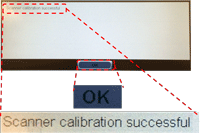
Figure 7: Touch OK after calibration steps are successfully finished.
|
7. The message "Scanner Calibration Successful" will be shown on screen after finishing the scanner calibration steps, as shown in Figure 7. Touch OK. |
Figure 8: Return to the menu screen.
|
8. The printer returns to the menu screen. |


![]()
Please let HP know if this helped you to resolve your issue, and help HP improve service.
![]()