Figure 3: Release the yellow print cartridge  |
3. Grasp the blue handle of the yellow print cartridge, and pull it towards yourself to release the cartridge from its slot. |
Figure 4: Pull the yellow print cartridge out 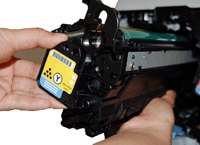 |
4. With one hand, slowly continue to pull the yellow print cartridge out of the printer, while supporting the yellow print cartridge with your other hand. Then put it on a clean level surface.
CAUTION: Do not touch the green roller on top of the cartridge. Doing so can damage the cartridge. |
Figure 5: Locate the magenta print cartridge  |
5. Locate the magenta print cartridge. |
Figure 6: Release the magenta print cartridge |
6. Grasp the handle of the magenta print cartridge, and pull it towards yourself to release the cartridge from its slot. |
Figure 7: Pull the magenta print cartridge out |
7. With one hand, slowly continue to pull the magenta print cartridge out of the printer, while supporting the magenta print cartridge with your other hand.
CAUTION: Do not touch the green roller on top of the cartridge. Doing so can damage the cartridge. |
Figure 8: Align the magenta print cartridge with the yellow cartridge slot |
8. Make sure the magenta print cartridge is correctly aligned before trying to insert it into the yellow print cartridge slot. |
Figure 9: Insert the magenta print cartridge into the yellow cartridge slot |
9. Gently push the magenta print cartridge into the yellow print cartridge slot until it clicks into place. |
Figure 10: Align the yellow print cartridge with the magenta print cartridge slot |
10. Make sure the yellow print cartridge is correctly aligned before trying to insert it into the magenta print cartridge slot. |
Figure 11: Insert the yellow print cartridge into the magenta print cartridge slot |
11. Gently push the yellow print cartridge into the magenta print cartridge slot until it clicks into place. |
Figure 12: Check the order of the yellow and magenta print cartridge
|
12. Check the order of the yellow and magenta print cartridges, to be sure that it is the same as shown in Figure 12 on the left.
|
Figure 13: Close the front door |
13. Lift up the front door until it clicks into place.
|


 Printable version