Figure 3: Release the black print cartridge  |
3. Grasp the blue handle of the black print cartridge and pull it towards yourself to release the cartridge from its slot. |
Figure 4: Pull the black print cartridge out 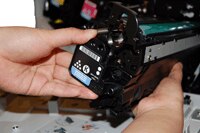 |
4. With one hand, slowly continue to pull the black print cartridge out of the printer, while supporting the
black print cartridge with your other hand. Then put it on a clean level surface.
CAUTION: Do not touch the green roller on top of the cartridge. Doing so can damage the cartridge. |
Figure 5: Unpack the new black print cartridge  |
5. Unpack the new black print cartridge from its protective bag. Remove the orange protective cover from the print cartridge.
NOTE: Store the used black print cartridge in the protective bag that came with the new black print cartridge. Information about recycling used print cartridges can be found
on the print cartridge box. |
Figure 6: Rock the new black print cartridge |
6. Grasp both sides of the print cartridge and distribute the toner by gently rocking the print cartridge 5 or 6 times. |
Figure 7: Remove the protective cover |
7. Remove the orange protective cover from the print cartridge.
CAUTION: Avoid prolonged exposure to light.
CAUTION: Do not touch the green roller on top of the cartridge. Doing so can damage the cartridge. |
Figure 8: Align the black print cartridge
|
8. Make sure the black print cartridge is correctly aligned before trying to insert it into the slot. |
Figure 9: Insert the black print cartridge |
9. Gently push the black print cartridge into its slot until it clicks into place. |
Figure 10: Close the front door |
10. Lift up the front door until it clicks into place.
|


 Printable version