Jump to content United States-English
HP.com Home Products and Services Support and Drivers Solutions How to Buy
» contact hp
search:
more options
 
HP invent - logo
business support center  >  technical support -HP Color LaserJet CM3530MFP  >  print quality troubleshooting tool

Print Quality Troubleshooting Tool for HP Color LaserJet CM3530MFP

How to remove and reinsert the black print cartridge
» 

Print Quality Home

» site map
» other resources
» frequently asked questions
Printing Procedures
» print PQ troubleshooting pages
» print diagnostics page
Issues on
» cyan test page
» magenta test page
» yellow-green test page
» green-yellow test page
» black test page
» other print quality issues associated with print-outs, copies, or scanned images
» diagnostics page
» order supplies
» technical support -HP Color LaserJet CM3530MFP
Bookmark this Web site
Content starts here Note: It may be helpful to print out these instructions before you start to remove and reinsert the black print cartridge.

Figure

Step

Figure 1: Open the front doorexample

1. Open the front door.

Make sure that the door is completely open.

Figure 2: Locate the black print cartridge example

2. Locate the black print cartridge.

Figure 3: Release the black print cartridge example

3. Grasp the blue handle of the black print cartridge and pull it towards yourself to release the cartridge from its slot.

Figure 4: Pull the black print cartridge out example
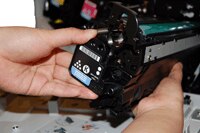
4. With one hand, slowly continue to pull the black print cartridge out of the printer, while supporting the black print cartridge with your other hand.

CAUTION: Do not touch the green roller on top of the cartridge. Doing so can damage the cartridge.

Figure 5: Align the black print cartridgeexample

5. Make sure the black print cartridge is correctly aligned before trying to insert it into the slot.

Figure 6: Insert the black print cartridgeexample

6. Gently push the black print cartridge into its slot until it clicks into place.

Figure 7: Close the front doorexample

7. Lift up the front door until it clicks into place.


Printable version
Privacy statement Using this site means you accept its terms
© 2004 Hewlett-Packard Development Company, L.P.