Improve your original photo prints through scanning
Use your scanner to touch up and enhance photo prints
Support & Drivers

Introduction
With the built-in features of HP Scanjet scanners, it's easy to touch up older snapshots or enhance your non-digital photo prints (like school photos, Polaroids, or photo booth photos). Learn how to scan your photos, make improvements using HP scanner software, and find the best products for the job.
Getting started with scanning

For high-quality photo scans, it's important to start with a clean scanner.

From the HP Solution Center, choose your scanner. Then select Scan Picture to scan your photo.
It's important to start with clean scanner glass and clean photos. Before you begin, clean the scanner glass with a bit of glass cleaner sprayed onto a lint-free cloth.
Follow these steps to scan photos using an HP Scanjet scanner (such as the HP Scanjet G4050 used here):
Step 1: Place your photo face down on the scanner glass and close the scanner lid.
Step 2: Open the HP Solution Center (found on your computer's desktop or in your programs folder):
Step 3: Select your scanner from the list.
Step 4: Select Scan Picture.
Step 5: Choose a destination for your scanned file, then select Scan.
Improve photos and fix flaws using your scanner software
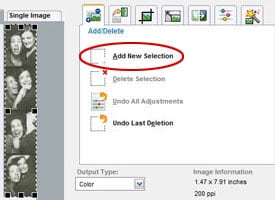
Click Add New Selection to create duplicates from your original image.
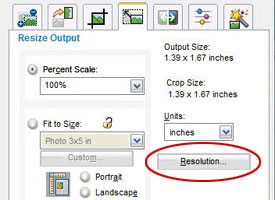
Be sure to set your resolution for optimum image quality.
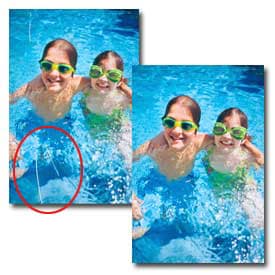
Eliminate photo imperfections, like dust marks and scratches, using the Correct Picture tab.
Once you’ve scanned in your photos—or, if you already have digital image files—use the following features to help improve and enhance them.
Edit and enhance
- Save your original copy: Select the Add/Delete tab and click Add New Selection to create duplicate images of your scanned photo—drag the frame over the portion of the photo you'd like to duplicate. When you make changes to your duplicates, your original scan will remain intact.
- Set your resolution: Maintain image quality when cropping or enlarging your photos by choosing the right resolution. Select the Resize Output tab, then select Resolution. 300 dpi is best for high-quality enlargements.
Learn more about the role of resolution in your photos. - Crop, scale, and resize: Under the Resize Output tab, you can crop, scale, enlarge, and resize your photo to a popular photo size or a custom size of your choosing.
Fix and eliminate flaws
- Adjust color and brightness: Select the Adjust Color tab or the Lighten/Darken tab, click Manual, and adjust your photos on the spot.
- Remove dust and scratches: Select the Correct Picture tab and check the Remove Dust & Scratches box to eliminate the appearance of photo imperfections.
- Sharpen, Restore Faded Color, and Apply Adaptive Lighting: Under the Correct Picture tab, you can also sharpen, restore color, or apply adaptive lighting to your image. Adjust the features until you achieve the look you want.
When you are done adjusting your photos, be sure to select Finish to make your changes and save your improved photo.
Get the scanner you need
HP has a variety of scanners to meet all your photo and document scanning needs.

HP Scanjet G3110 Photo Scanner
$109.99
- Quality photo scans with 4800 x 9600 dpi, 48-bit color1
- Scan slides, negatives, photos, and documents
- Edit text from scanned documents

HP Scanjet G4050 Photo Scanner
$219.99
- Superior color accuracy and photo reproduction with 6-color, 96-bit scanning2
- Restore faded colors from photos
- Efficient slide and negative scanning
Visit the HP printer buying guides to see the entire selection of HP printers and e-All-in-Ones.
Learn more
- Learn the basics of photo scanning and how to scan, resize, and share photos.
- Learn how to Make your own photo gifts with projects and products from HP.
- Discover more Photo editing tips to get the most from your favorite photos.
- 1Maximum resolution may be limited by PC system factors and scan size.
- 2Compared to in-class scanners, color accuracy testing by Image Engineering, December 2006. For detailed results and a list of tested scanners, go to digitalkamera.image-engineering.de/index.php/Publications.