Note: It may be helpful to print out these instructions before you start to replace the secondary transfer roller.
Part I: Remove old secondary transfer unit and uppack the new one.
| Figure | Step |
|---|---|
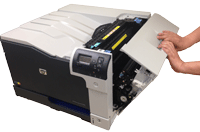
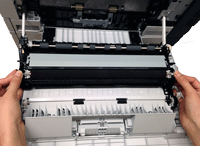
Figure 1.1: Open the right door
|
1.1. Open the right door. This will also lower the secondary transfer assembly.
CAUTION: Do not touch the spongy roller surface unless you are replacing the roller. Skin oils on the roller can cause image quality problems. |
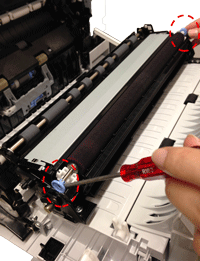
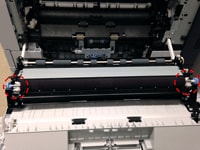
Figure 1.2: Release the roller shaft
|
1.2. Use a small flat-blade screwdriver to carefully release the roller shaft from the collars, as shown in Figure 1.2.
|
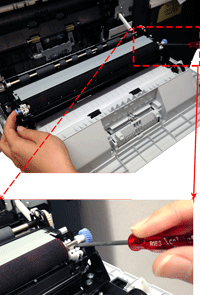
Figure 1.3: Remove the secondary transfer roller.
|
1.3. Grasp the two ends of the secondary transfer roller, and carefully take it out of the printer, as shown in Figure 1.3. |
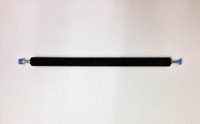
Figure 1.4: Put the secondary transfer roller on a clean surface
|
1.4. Put the secondary transfer roller on a flat clean surface, in a safe and protected location. CAUTION: Do not touch the spongy roller surface of the secondary transfer roller. Skin oils on the roller can cause image quality problems. |

Part II: Install new secondary transfer unit.
| Figure | Step |
|---|---|
Figure 2.1: Align the secondary transfer roller with its slot
|
2.1. Align the secondary transfer roller with its slot, as shown in Figure 2.1. |
Figure 2.2: Push the two sides in
|
2.2. Gentally press the two sides in until they click into place, as shown in Figure 2.2. |
Figure 2.3: Close the right door
|
2.3. Lift up the right door until it clicks into place. This will also lift the secondary transfer roller assembly to the position in which it is fully engaged. |
![]()
Please let HP know if this helped you to resolve your issue, and help HP improve service.
![]()