The ITB kit includes the intermediate-transfer belt (ITB) unit, secondary transfer roller, and instructions.
Note: It may be helpful to print out these instructions before you start to install the new parts in the ITB kit.
|
Figure 1: Open the right door
|
1. Open the right door. This will reveal the ITB unit as shown below.

CAUTION: Do not touch the shiny black surface of the belt on the top of the ITB unit, or place anything on it. This may damage the ITB unit and cause print quality problems.
|
|
Figure 2: Lower the secondary transfer assembly
|
2. Push down on the blue lever as shown in Figure 2 to fully lower the secondary transfer assembly.
|
|
Figure 3: Grasp the front handles |
3. Grasp the handles on the front of the ITB unit, as shown in the callout of Figure 3. |
|
Figure 4: Pull the ITB unit
|
4. Pull the ITB unit straight toward yourself gently until two large blue side handles expand along the right and left sides of the ITB unit.
CAUTION: As you pull the ITB unit part way out, be careful to maintain its alignment with the slot that holds it in the printer. The ITB unit should come out easily.
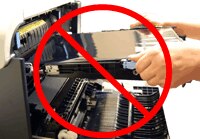

|
|
Figure 5: Switch your hands

|
5. Switch one of your hands to the location of the large blue handle on the side of the ITB unit as shown in Figure 5, and then switch the other hand.
CAUTION: Do not touch the shiny black surface of the belt on the top of the ITB unit, or place anything on it. This may damage the transfer unit and cause print quality problems.
|
|
Figure 6: Remove the ITB unit
|
6. Lift the ITB unit slightly, and gently finish pulling the ITB unit out of the printer.
CAUTION: The ITB unit is a sensitive component. Be careful when handling the ITB unit, so that it is not damaged.
|
|
Figure 7: Put the ITB unit on a clean surface
|
7. Put the ITB unit on a flat clean surface in a safe and protected location.
CAUTION: Do not touch the shiny black surface of the belt on the top of the ITB unit, or place anything on it. This may damage the transfer unit and cause print quality problems.
|
|
Figure 8: Unpack the new ITB unit
|
8. Unpack the new ITB unit from its protective bag, and put it on a flat clean surface in a safe and protected location.
CAUTION: Make sure to remove all of the packing tape (callout 1) and the protective cover sheet (callout 2), as shown in Figure 8.
CAUTION: Do not touch the shiny black surface of the belt on the top of the ITB unit, or place anything on it. This may damage the transfer unit and cause print quality problems.
NOTE: Follow the instructions that came with the new ITB kit to recycle the used ITB unit.
|
|
Figure 9: Grasp the large blue handles and align the new ITB unit with its slot
|
9. Grasp the new ITB unit at the locations of large blue handles on both sides of the ITB unit, as shown in Figure 9. Align the ITB unit with its slot. Then gently push it half way into the slot. It should slide in easily.
CAUTION: Only push on the side handles of the ITB unit as indicated. Do not touch the shiny black surface of the belt on the top of the ITB unit, or place anything on it. This may damage the ITB unit and cause print quality problems.
|
|
Figure 10: Switch your hands
|
10. Switch one of your hands to the location of the handle on the front of the ITB unit, as shown in Figure 10, and then switch the other hand.
CAUTION: Only touch the handles on the front of the ITB unit as indicated. Do not touch the shiny black surface of the belt on the top or front of the ITB unit, or place anything on it. This may damage the ITB unit and cause print quality problems.
|
|
Figure 11: Insert the ITB unit
|
11. Gently finish inserting the ITB unit while maintaining its alignment with the slot in the printer, until it clicks into place. It should slide in easily.
CAUTION: Only touch the handles on the front of the ITB unit as indicated. Do not touch the shiny black surface of the belt on the top or front of the ITB unit, or place anything on it. This may damage the ITB unit and cause print quality problems. |
|
Figure 12: Grasp the blue handle on the secondary transfer roller and lift it up
|
12. Grasp the blue handle on the secondary transfer roller and lift it up, as shown in Figure 12.
|
|
Figure 13: Grasp the black gear at the other end of the secondary transfer roller and lift it up
|
13. Grasp the black gear at the other end of the secondary transfer rollor and lift it up, as shown in Figure 13.
|
|
Figure 14: Put the secondary transfer roller on a clean surface
|
14. Grasp the two ends of the secondary transfer roller, and carefully take it out of printer. Put the secondary transfer roller on a flat clean surface in a safe and protected location.
|
|
Figure 15: Unpack the new secondary transfer roller
|
15. Unpack the new secondary transfer roller from its protective bag, and put it on a flat clean surface in a safe and protected location.
CAUTION: Do not touch the black surface of the secondary transfer roller, or place anything on it. This may damage the roller and cause print quality problems.
NOTE: Follow the instructions that came with the new ITB kit to recycle the used secondary transfer roller.
|
|
Figure 16: Align the secondary transfer roller with its slot. Place the blue side in first

|
16. Align the secondary transfer roller with its slot. With the pin facing down, as shown in Figure 16, gently press the blue side in until it clicks into place first.
|
|
Figure 17: Place the black side in

|
17. Rotate the black gear until its pin faces down, as shown in Figure 17. Press it in until it clicks into place.
|
|
Figure 18: Lift the secondary transfer assembly
|
18. Lift the secondary transfer assembly back into its original position.
|
|
Figure 19: Close the right door |
19. Lift up the right door until it clicks into place. |


 Printable version